Overview
The Pay Button function gives the user the ability to create an HTML link that can be embedded into HTML content (e.g. a website or email). Once clicked, it allows payment to be made via a hosted form that will be pre-populated with the data specified when creating the link.
The advantage of using a Pay Button is that it offers the functionality of Cardstream without having to complete a Hosted or Direct integration, meaning it can be included in basic HTML without the need for any scripting languages.
Creating a Pay Button/Link/QR Code
To create a Pay Button, Link or QR Code open the Virtual Terminal tab and under the Transaction Process field select ‘Generate a Pay Button’.
The fields shown on the Pay Button creator screen are:
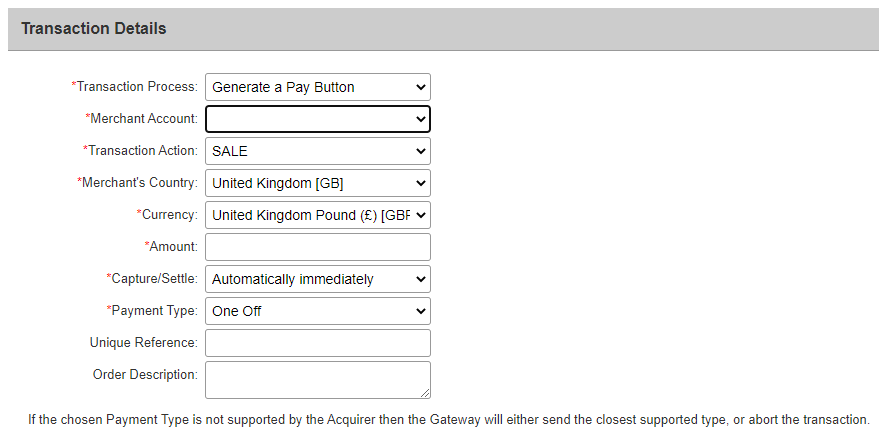
Transaction Details
Merchant Account (Required): This specifies the Merchant Account to receive the payments into. The list will show all your merchant accounts and a default test account.
Merchant Password (Required if set): This field is only presented if the account already has a Merchant password setup via the preferences page. We advise using signatures instead which are handled automatically when the button is created if a signature key is set using the preferences page.
Transaction Action (Required): This specifies the transaction type. Select SALE, PREAUTH or VERIFY. (The transaction types available depend on the Merchants and Acquirers set-up.)
Merchant’s Country (Required): The country in which the Merchant is based.
Currency (Required): This is the currency for the transaction. The list will show all the currencies that the selected Merchant Account can handle.
Amount (Required): The amount due for payment by the customer. NOTE: The value should be given without the currency symbol, e.g. 10.00.
Capture/Settle (Required): This specifies whether or not the funds should be captured immediately, in (x) amount of days or manually when required.
Payment Type (Required): This specifies if the payment is a one off, one off with credentials already on file (COF), initial or subsequent recurring (COF) or and initial or subsequent instalment (COF).
Unique Reference (Optional): This reference will be logged with any transaction made using the link and will be shown in the MMS. It can be used for order tracking, etc.
Order Description (Optional): This description will be logged with any transaction made using the link and will be shown in the MMS.
Pay Button Details
Button Text (Required): This is the text to display as the link text.
Redirect URL on success (Required): The location to go to after the payment has taken place. This can be any URL you wish to direct the customer to after a payment or attempted payment has been made. NOTE: If a value for Redirect URL on Failure is supplied, the URL specified for Redirect URL will only be used when a payment has been successful.
Redirect URL on Failure (Optional): The location to go after a payment has failed. If no value is supplied the value from Redirect URL on success will be used.
Custom Amount (Optional): This confirms if the payment value is fixes or if the customer can alter the payment amount.
Customer Address (Optional): Set if the customer is required to provide their address. If set to ‘Required’, the ‘Address’ and ‘Postcode’ sections on the hosted form are marked as required and cannot be omitted. If set to ‘Not Required’, the ‘Address’ and ‘Postcode’ fields are optional.
The Customer Details, Delivery Details, Purchase Details, Notification Details and Customer Details sections are all options.
Once ‘Generate Button’ has been clicked, the link will be formatted and displayed on the next page.